
Description – In this tutorial, we will learn
- How to create a WCF Service
- How to create Service Endpoints
- How to Host the Service over IIS
- How to Consume the service using ASP.NET Web application
Step 1: First open Visual Studio (any version) and Create a new Class Library project.

Step 2: Once the project gets created, delete the Class1.cs file which is auto-generated.

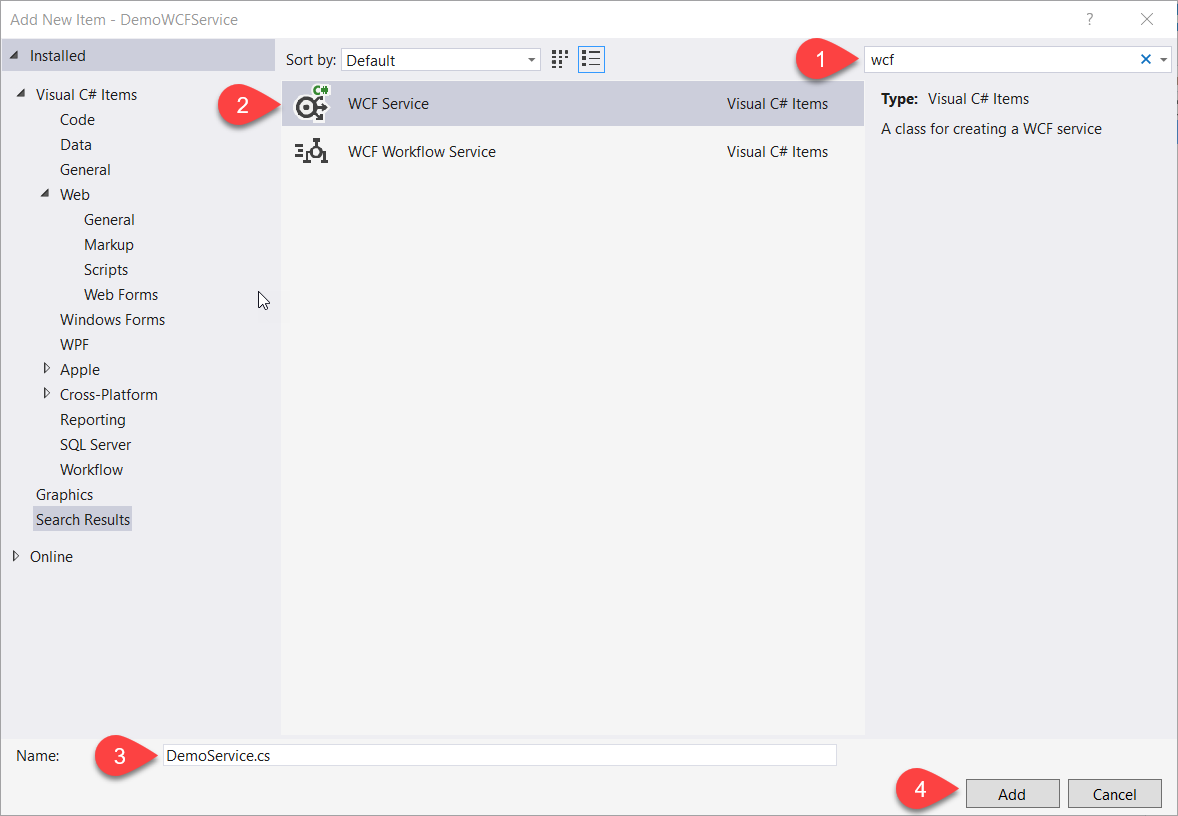
Step 3: Right Click on Project Name and Add a WCF Service.

Step 4: Once the WCF Service is added to the project, it will add two types of files mentioned below.

As you can see above, System.ServiceModel is added to the reference libraries as this is the main .NET assembly which supports WCF Services. So, it is a must.
Step 5: First open IDemoService.cs file and replace the code with the below mentioned code.
using System.ServiceModel;

namespace DemoWCFService
{
    [ServiceContract] //Till will tells the class file that this is a WCF Service
    public interface IDemoService
    {
        [OperationContract] //This will expose the Operations that can be operated using this WCF Service
        string GetResponse(); //This is the Method name implementation.
    }
}
As you can see above, System.ServiceModel is referenced in the using statements.
IDemoService interface is decorated with [ServiceContract] attribute which tells the project that this is a WCF Service.
GetResponse() is a custom method which returns string and it is also decorated with [OperationContract] attribute, which tells that this method can be consumed by client.
Step 6: Open DemoService.cs file and replace the code with the below mentioned code.
namespace DemoWCFService
{
    public class DemoService : IDemoService
    {
        string IDemoService.GetResponse() => "This is the Response from WCF Service.";
    }
}
As it is very simple to understand, that the method that we have declared in the Interface file is implemented here and it is returning the simple text.

Step 7: Now comes the main concept i.e. Endpoints.
Endpoints are the access points for the client applications to access the WCF Service for request and response functionality. They have main 3 properties:
- Address – it tells at which location the service is hosted
- Type of Binding – it specifies that in which format the data is to be exchanged
- Contract – it is actually used to specify the interface name that we have just created. It tells which methods are accessible to the client.
<configuration>
    <system.serviceModel>
        <behaviors>
            <serviceBehaviors>
                <behavior name="mexBehaviour">
                    <serviceMetadata httpGetEnabled="true" httpsGetEnabled="true" />
                    <serviceDebug includeExceptionDetailInFaults="false" />
                </behavior>
            </serviceBehaviors>
        </behaviors>
        <services>
            <service name="DemoWCFService.DemoService" behaviorConfiguration="mexBehaviour">
                <endpoint address="" binding="basicHttpBinding" contract="DemoWCFService.IDemoService">
                    <identity>
                        <dns value="localhost" />
                    </identity>
                </endpoint>
                <endpoint address="mex" binding="mexHttpBinding" contract="IMetadataExchange" />
                <host>
                    <baseAddresses>
                        <add baseAddress="http://localhost:8733/DemoWCFService/DemoService/" />
                    </baseAddresses>
                </host>
            </service>
        </services>
    </system.serviceModel>
</configuration>
You will find a file named app.config, the above code is to be pasted in that file. If you are using Visual Studio 2013 and above, so this file with this code will be autogenerated but not in the earlier versions.
Now let’s have a look at the app.config file code.
- In the behaviours element, you can see that a tag name serviceMetadata is added. This tag allows the MetaData of the service to be available to the client in the form of WSDL document. If you wish to know what is WSDL document, I will explain that in a later tutorial but for now think it to be a document which shares data to the client.
- In the services tag, we have named the service which is the combination of namespace of class file followed by classname.
- Then we have specified endpoint (explained above), address property has been left blank, but you can give it any meaningful name, binding is basic HTTP binding, contract name is the name of the interface. Identity element is used to specify that we want to host the service at localhost means using IIS.
- Another endpoint is being mentioned which allows WSDL document to be generated.
- Then in the host address, we have added the baseAddress as localhost followed by port number of local system.
Now we have completed creating our service. Now we need a hosting application which will host it over HTTP Protocol.
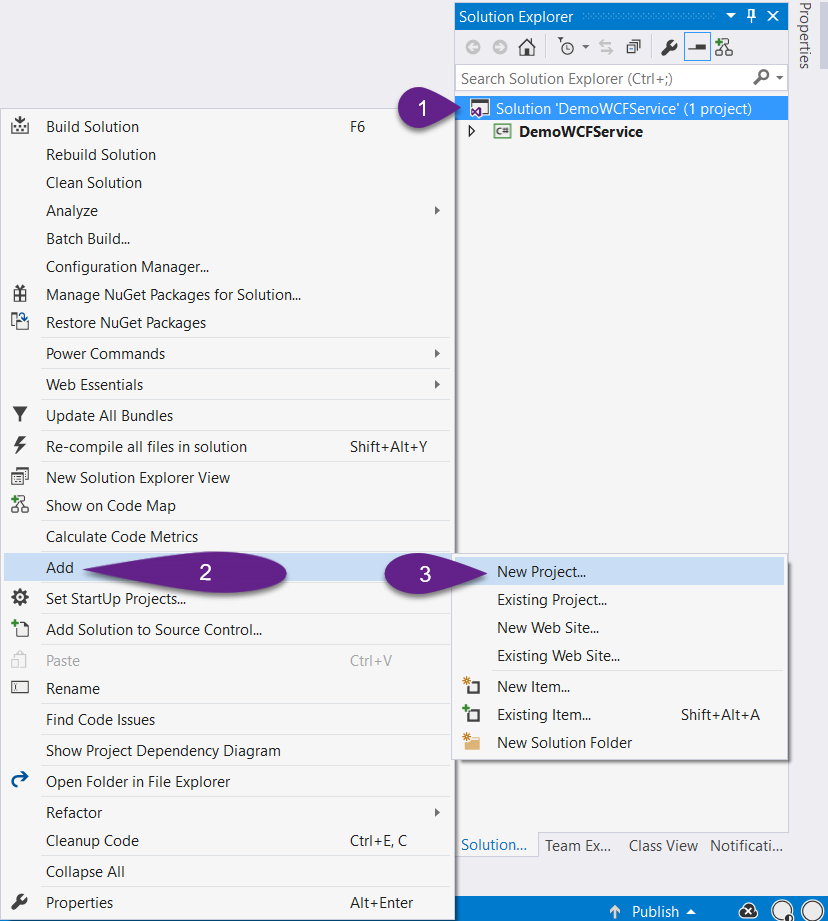
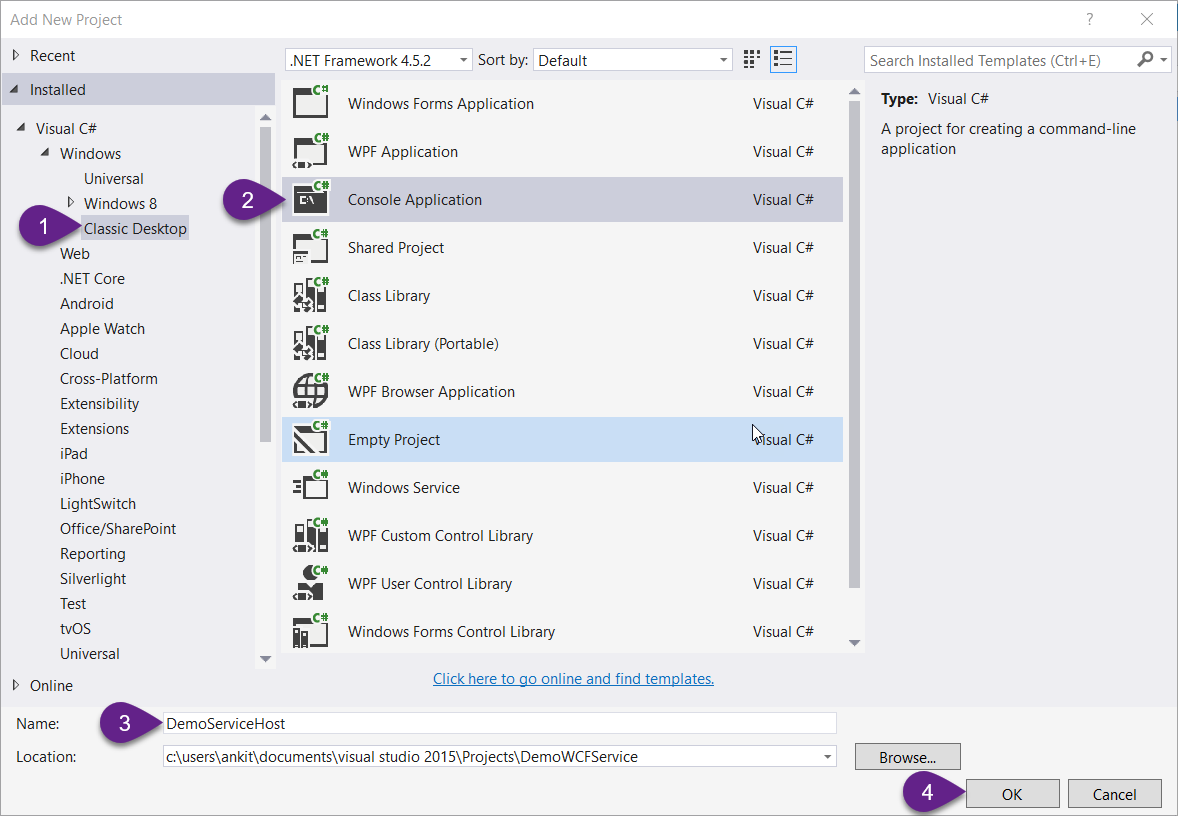
Step 8: Now add a new Windows Console application project to the same solution.
Once the project is created, Add a reference to System.ServiceModel assembly and the WCF Service project.


Now open Program.cs file and replace the code with the below one.
using System;
using DemoWCFService;
using System.ServiceModel;

namespace DemoServiceHost
{
    class Program
    {
        static void Main(string[] args)
        {
            using (var host = new ServiceHost(typeof(DemoService)))
            {
                host.Open();
                Console.WriteLine("The Host Started Successfully at " + DateTime.Now);
                Console.ReadLine();
            }
        }
    }
}
In the above code, we have created the object of ServiceHost class and pass the type of service to its constructor. The rest of the code is self explanatory.
Now in the App.config file, add the same code as that of the WCFService project’s App.config file that we just discussed above.
Set this as Startup project and run the application using Ctrl + F5 keys together, a console window will open which confirms that your service is now hosted.
Now its the time to consume that service in an ASP.NET Web application
Step 9: Add a new ASP.NET Web Application project to the same solution.


Step 10: First thing to keep in mind is that the service host should be running to be consumed. So, please go to folder of your Service host project and find the bin folder, there you will find exe file, run that in the Administrator mode.

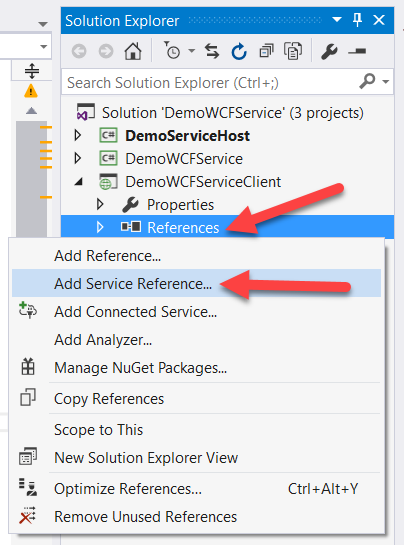
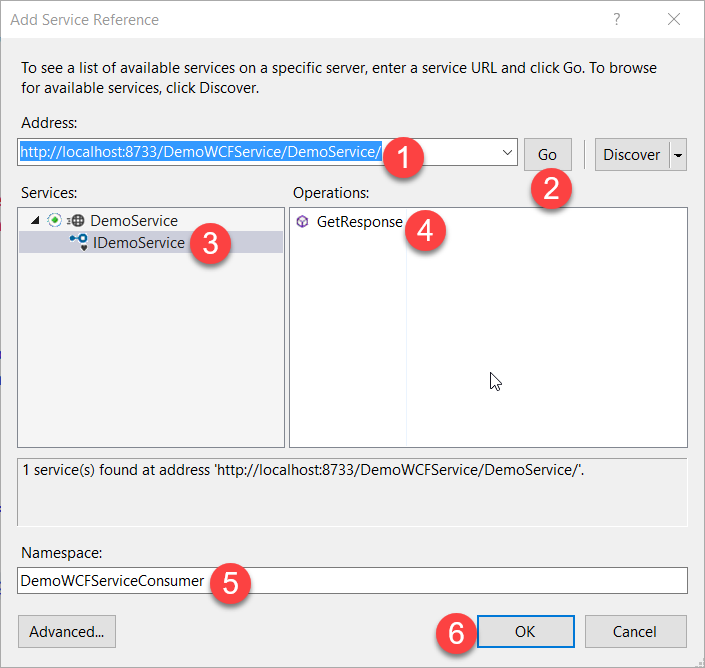
Step 11: Lets consume the WCF Service that we created to generate the proxy classes so that we can use them.
Step 12: Add a new Webform to the project and press f7 key to move to the source code file.
Add the following code to the Page_Load event.
using System;
using DemoWCFServiceClient.DemoWCFServiceConsumer;

namespace DemoWCFServiceClient
{
    public partial class index : System.Web.UI.Page
    {
        protected void Page_Load(object sender, EventArgs e)
        {
            var client = new DemoServiceClient();
            Response.Write(client.GetResponse());
        }
    }
}
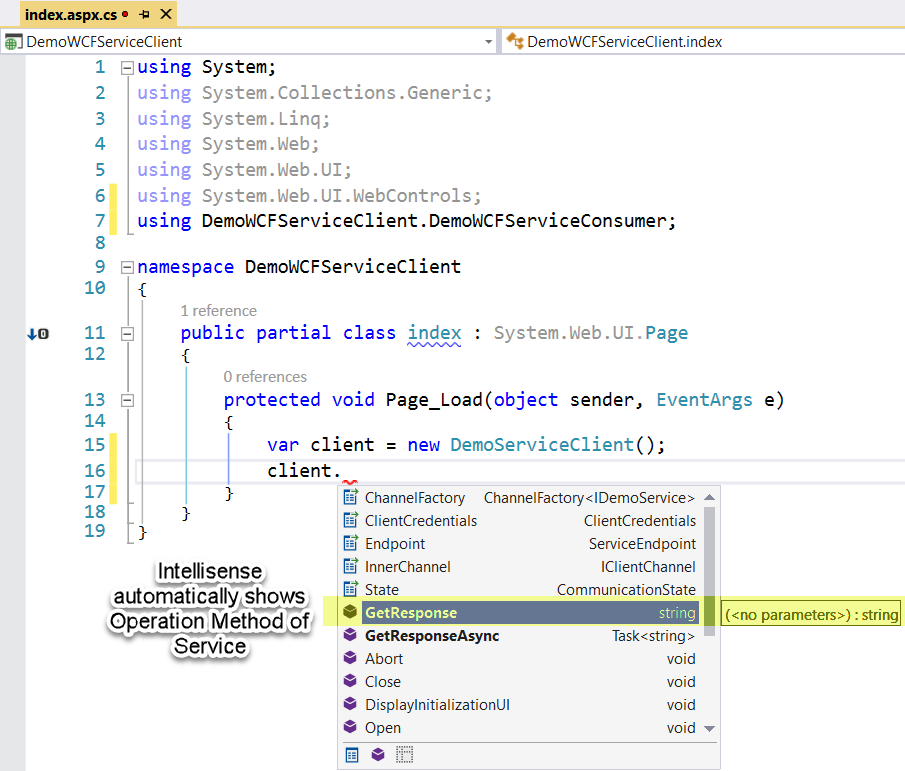
Just you need, is to add the Service proxy class in the using directive and in Page_Load() event, we create instance of the client and the method of the WCF Service will be automatically visible to the instance as shown in the above images.
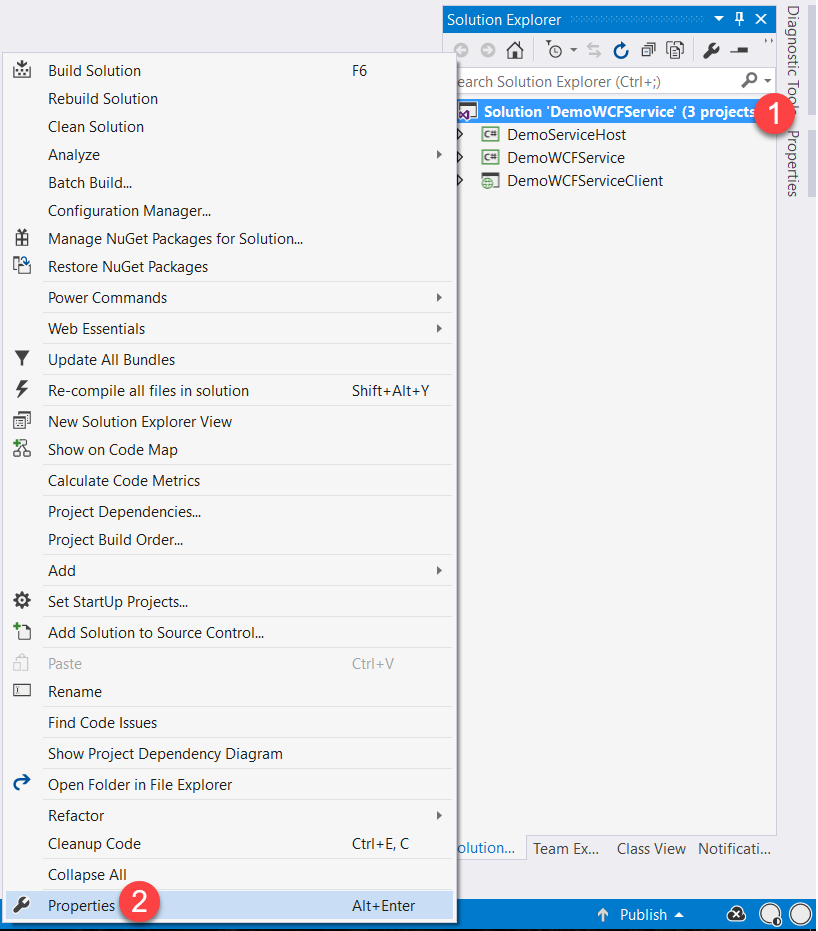
Now, finally you have consumed the service, lets run the project and check if everything is fine but before that we need to do some settings to run the host and web application at the same time.
Just follow the below two steps:

Now press Ctrl + f5 together and web page will load and the response from wcf service will be displayed on the page as shown below.

If I missed something, please comment it so that I can update OR give your valuable feedback and share.
Enjoy coding!!

One thought on “Basics of WCF Service with Hosting and Consuming using ASP.NET”